Content creation using Generative AI has ushered in a new era of efficiency and creativity in the digital landscape. With the ability to generate text, images, videos, and even music, Generative AI is transforming how businesses approach content development. Gone are the days of laborious manual content creation processes; AI algorithms can now analyze vast datasets, understand patterns, and produce compelling content that resonates with target audiences. This revolutionary technology not only accelerates content production but also enables businesses to maintain consistency, relevance, and engagement across various platforms, driving growth and success in the ever-evolving digital world.
This blog is structured into three main sections, each focusing on a key aspect of Generative AI and its implementation using Azure OpenAI within Sitefinity development.
1. Unlocking Generative AI: Diverse Applications in Today’s World
2. Implementing Generative AI with Azure OpenAI: A Practical Guide
3. Integrating OpenAI into Sitefinity: Optimizing Content Creation and Management
Generative AI is available in Sitefinity15:
To install Sitefinity 15, you’ll need to utilize Visual Studio for a seamless experience. With project managers deprecated, downloading applications from the Sitefinity website is no longer possible. However, you can opt for either the CLI or NuGet packages to accomplish this task efficiently.
1. Unlocking Generative AI: Diverse Applications in Today’s World
Generative AI is versatile and can be applied in numerous ways across various industries and domains. Here are some different ways Generative AI is being used in today’s world:
Content Generation: Generative AI can create text, images, videos, and music, reducing the time and effort required for content creation across platforms like social media, blogs, and marketing campaigns.
Chatbots and Virtual Assistants: AI-powered chatbots and virtual assistants use Generative AI to engage with users, answer queries, provide customer support, and automate routine tasks, improving customer experience and efficiency.
Art and Design: Generative AI is used in art and design to generate unique visuals, patterns, and styles, aiding artists and designers in creating innovative and personalized artworks, logos, and graphics.
Natural Language Processing (NLP): NLP models based on Generative AI can understand, interpret, and generate human-like text, enabling applications such as language translation, sentiment analysis, and content summarization.
Video and Image Editing: AI-driven tools leverage Generative AI to enhance and edit videos and images automatically, including tasks like color correction, object removal, style transfer, and image synthesis.
Product and Fashion Design: Generative AI assists in generating product designs, prototypes, and fashion concepts based on user inputs, trends, and preferences, speeding up the design process and fostering innovation.
Healthcare: In healthcare, Generative AI is used for medical image analysis, drug discovery, patient diagnosis, and personalized treatment recommendations, contributing to advancements in healthcare delivery and outcomes.
Gaming and Simulation: AI-powered game engines use Generative AI to create realistic environments, characters, and scenarios, enhancing gaming experiences and simulations in industries like education and training.
Financial Analysis: Generative AI models analyze financial data, forecast market trends, automate trading strategies, and generate financial reports, assisting analysts and investors in making informed decisions.
Content Personalization: AI algorithms powered by Generative AI personalize content recommendations, advertisements, and user interfaces based on individual preferences, behavior, and demographics, improving user engagement and retention.
2. Implementing Generative AI with Azure OpenAI: A Practical Guide
Azure OpenAI Service provides REST API access to OpenAI’s powerful language models. These models helps in content generation, summarization, image understanding, semantic search, and natural language to code translation.
Steps to create OpenAI model and its Pricing:
-
- To use the services, you must first create a Microsoft Azure account if one hasn’t already.
- After the creation of the account, you will be directed to the account hope page. Go to the ‘Resource Group’ and click ‘Create’.
- Complete the form, click “Next,” and create a new resource group. The Azure Open AI resource has to be created in the resource group that you have already created.
- In the resource group, click Create and type “Azure Open AI” into the search bar.

Azure OpenAI Service
-
- After selecting “Create,” fill out the form, then select “Next.”
The Azure Open AI resource won’t be available to everyone. Beneath the “Pricing Tier” textbox, there will be a link stating that you must request access. All you have to do is complete the form and submit it; you will receive a response within two to three days.
After moving forward with the steps, you create the resource at the last step and it starts getting deployed. Below is the screenshot after the deployment is completed.

In order to use the resource you have to go to the Azure Open AI Studio.

The deployment model name will be used in the Sitefinity backend.
3. Integrating OpenAI into Sitefinity: Optimizing Content Creation and Management
- Install the Nuget package Progress.Sitefinity.AIServiceConnector.
- The AI service needs to be installed and enabled in the Sitefinity backend at this point. Navigate to Modules & Services -> Administration. Find and install AI services by clicking Actions -> Install.
- Restart the site.
- Now the AI icon will appear but you will not see the services provided. You have to configure the Azure Open AI Service in the sitefinity.
- Navigate to Settings -> Administration. Click the AI services tab in the left pane.
- As previously indicated, you can obtain your API Key and Endpoint using the Azure account interface.
You can get the most recent version of the API by clicking on the question mark symbol, visiting the website, and using the link.

Example1: Generate text from scratch
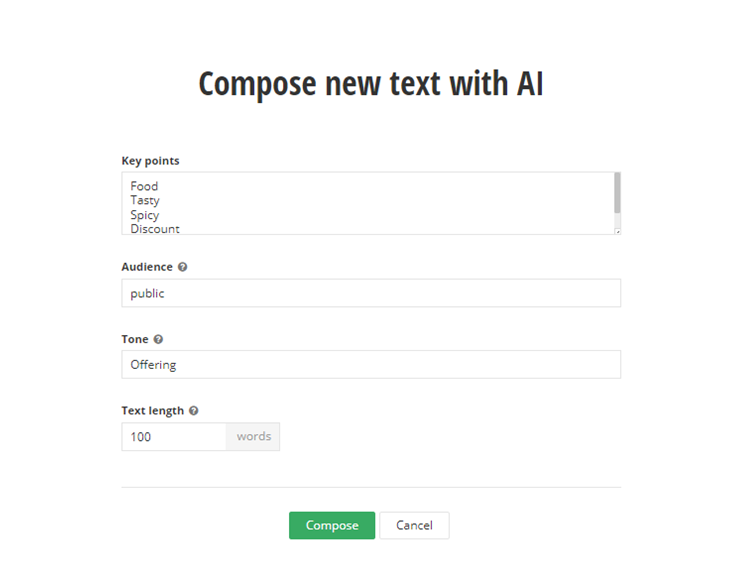
Compose Text – Available for content blocks in rich text editors.It helps you generate text from scratch with the help of AI.
- Click on the AI button and from the drop-down menu select Compose new text.
- In the key points text area, list key points, one per line, that will be used to generate the prompt to the AI
- In the Audience text field, describe the audience to provide the AI service with context to generate better text.
- In the Tone field describe the tone of the text. For instance, enter formal or friendly.
- In the Text length number box, provide the maximum number of words that can be generated for the text.
- After Clicking compose generative AI produces a text paragraph as you desire.

The generated text is displayed and you have the option to:
- Insert – add it to the text editor
- Copy – copy it to clipboard
- Compose again – generate a new text if the previous result is not satisfactory. Depending on your AI service subscription plan if you generate too many texts or too quickly you might receive an error message.
Example 2: Summarize Text
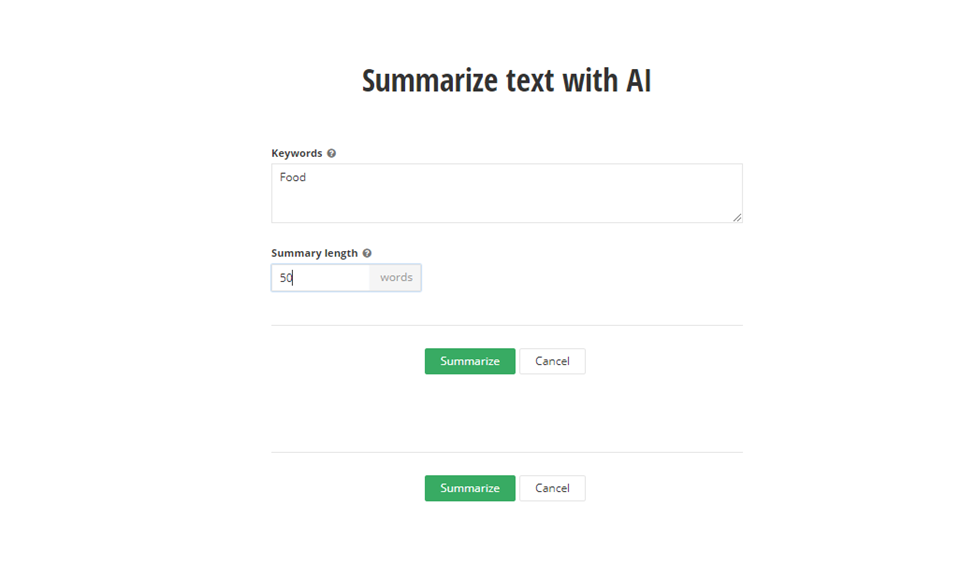
Summarize:- Making longer text into shorter one based on either keywords and the length you want.
- Click the AI button and select the Summarize
- In the Keywords text area, provide keywords separated by comma. These keywords are used to generate the prompt to the AI service.
- In the Summary length number box, provide a limit for the number of words.
- Click Summarize.
For example I have taken a Food paragraph from google and i am summarizing it

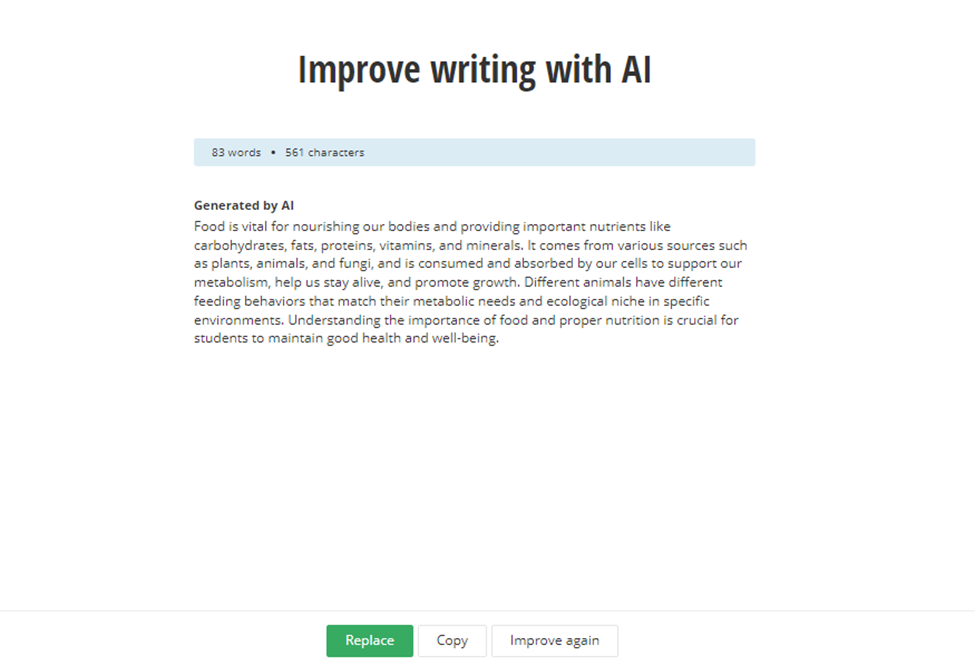
Example 3: Improve writing:- Improve grammar, language, tone of voice.
Basically making your text sound better.
- Click the AI button and select the Improve writing
- In the Audience text field, describe the audience to provide the AI service with context to generate better text.
- In the Tone field describe the tone of the text. For instance, enter formal or friendly.
- In the Text length number box, provide the maximum number of words that can be generated for the text.
- Click.
Generate a new improved text if you are not satisfied with the results. Depending on your AI service subscription plan if you generate too many texts or too quickly you might receive an error message


